
Hello! Long time no speak! Life became VERY busy after my last post on here when my littlest was only very young. He's now 27
months old and I now run my own semi permanent makeup and beauty business which feels like a dream come true. I've decided to
use my platform on Blogger to deliver some of my knowledge as an artist/ therapist now aswell as other posts that take my fancy.
I have been a beauty therapist for nine years and wanted to advance my skills this year as I feel the industry is wanting more
and more higher level, results driven aesthetic treatments. I qualified as a semi permanent makeup artist (spmu for short)
earlier this year with KB Pro.
So what's the reason for this post?
Well, I currently specialise in mircoblading and I have noticed a reoccuring question being asked post procedure for my ladies
- Is this normal?
What i am refering to is the healing process of microblading in particular. In this post I would like to break down the healing
process for my current and future clients as well as people considering microblading or those that have had the treatment and
are asking this very question.
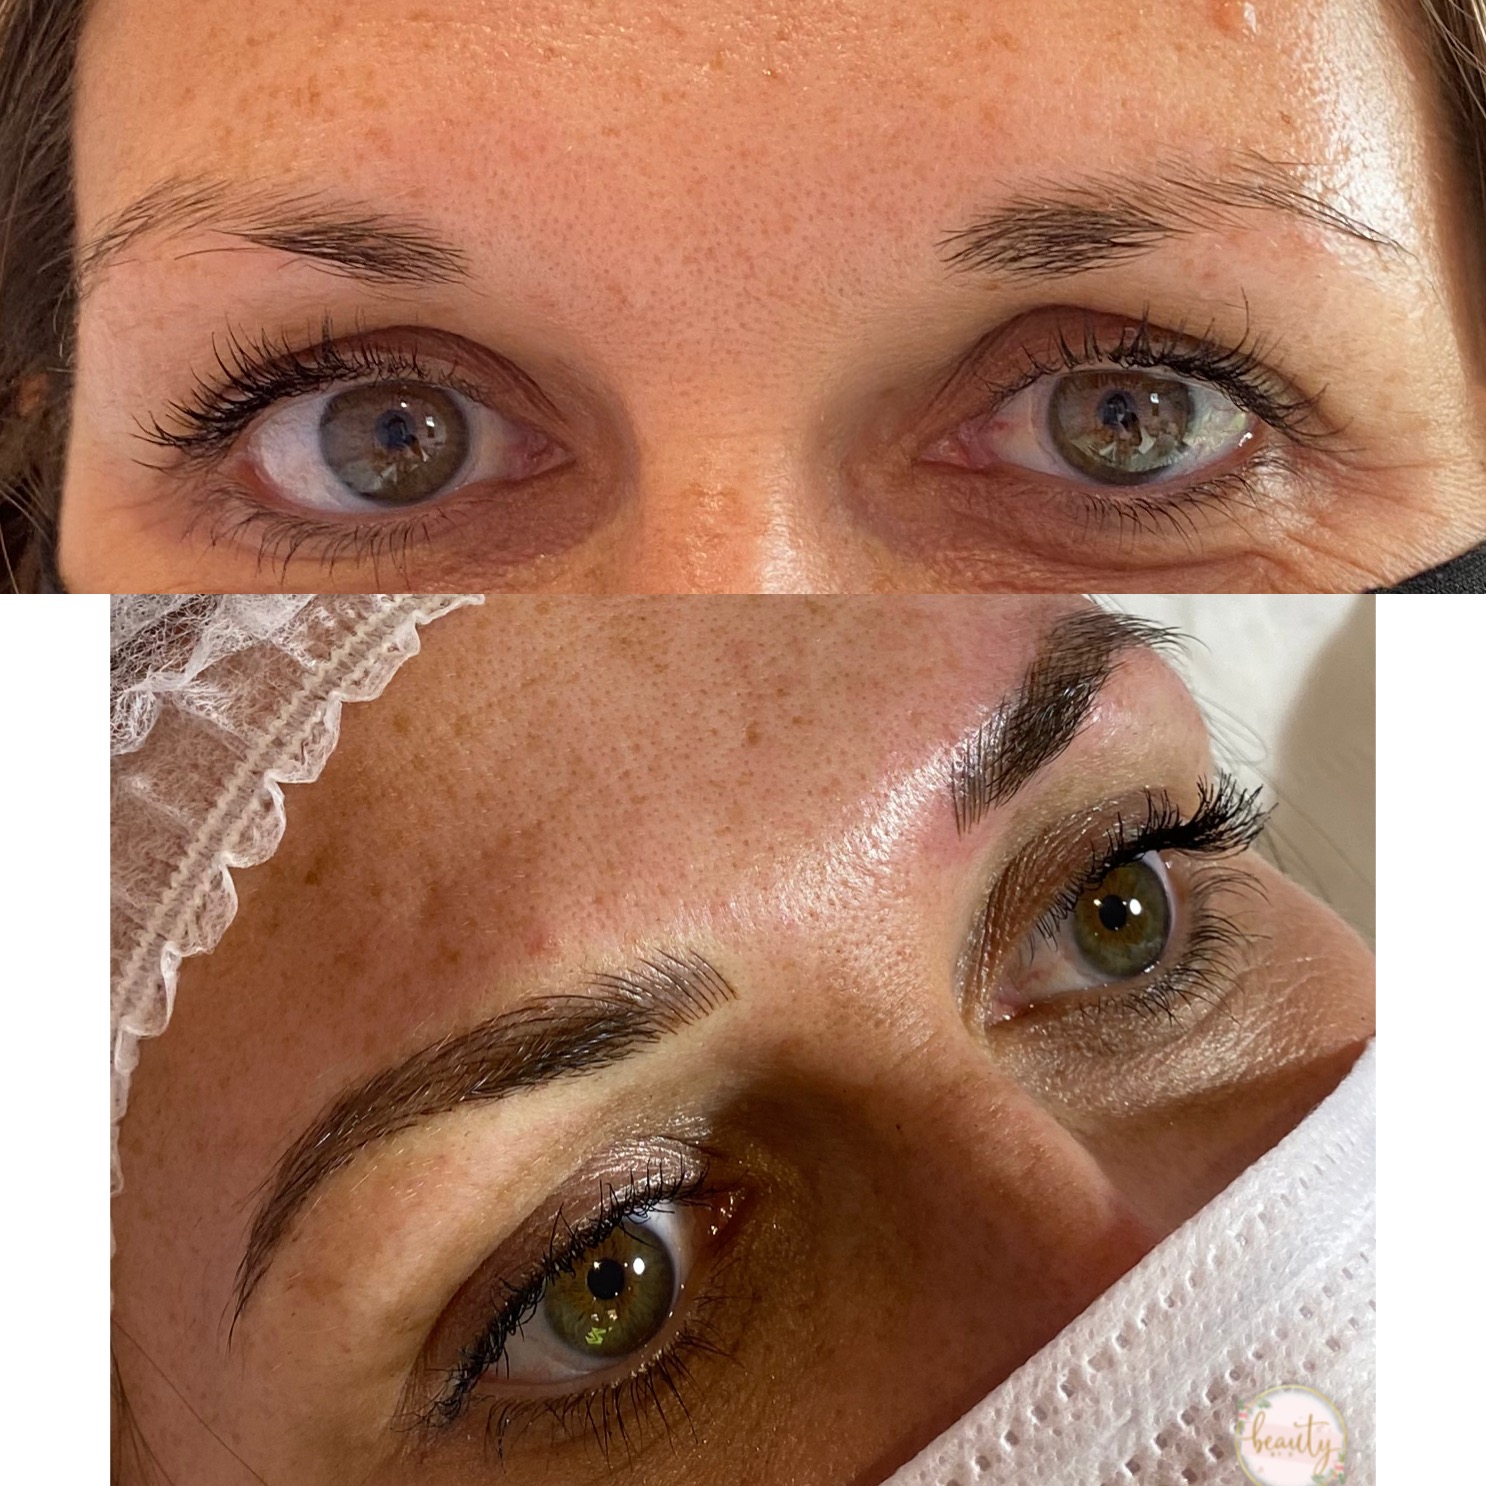
In this post i am going to include as much information as possible, with my clients as case study images, regarding the healing
process of microblading from immeditaley after the treatment right upto your topup around six weeks later. I will also break
down what microblading is, who it is suitable for and what to expect from a microbalding service at my studio - Beauty By B.

Microblading is a method used to create realistic hair strokes that can mimic lost hairs or give fullness to exisiting brows.
It involves using a disposable hand tool with super fine needles to deposit pigment within the upper dermis layer of this skin.
The semi permanent procedure is suitable for all skin tones. The perfect client for microblading at Beauty By B is one who is
experiencing hair loss, has thinning eyebrows or a cleint who has over plucked when the trend was minimal brows. However the
service is also suitable for those simply wanting to enhance and define their current brows and those that are unhappy with
their natural shape and/or need positional correction.
The purpose of microblading is to enhance the natural features of a client. Microblading is soft and subtle – it is meant to look much more natural. Microblading uses pigments rather than ink which is used during traditional tattoos. The pigments are designed and meant to gently fade over time. Fading is not considered a bad thing since it allows the artist and client to make changes to colour and shape over the years as natural colouration and facial changes occur. Pigments during microblading are not as tight and densely packed into the skin as a traditional tattoo. This allows for healed results of very fine, thin, and crisp hair lines. Because the pigment is not as dense it does not last as long but it also does not fade to an unnatural undertone. A colour boost/touch up is usually required between 18-24 months. Touch-ups may be required sooner for oily-skinned clients, those who tan often, or or often expose brow area to certain chemicals (facial peels, chlorine, anti-aging products, etc.). Pigment retention varies depending on skin type, age, aftercare, immune system, medications, certain chemicals, and the type of pigment used.

A pre-treatment consultation is the very first step of your journey to perfect brows. I either arrange posting this to your
house along with a patch test or book you in to visit me in the studio. The pre-treatment form will cover contra-indications
that may mean the treatment is not suitable for yourself at the present moment. It is important to declare any contra-
indications as failure to do so could be detrimental to your health or the results of your treatment. *Please note patch tests
must be carried out 24 hours before the treatment begins.
On the day of your first treatment you will arrive at the studio and I will take your before photographs and then ask you to fill out a treatment consultation form whilst I apply your pre-numb cream and triple check your pre-treat consult form. Once all forms are filled out, we have had a good chat and I have gained a good understanding of your desired outcome we will mive onto the next stage.
The next stage is deisgning your new brow shape and finding your perfect pigment. These credentials are completely tailored pto you! Using a brow pencil I will design a template of your new brows and only when you are completely happy and confident will microblading proceed. Artistry photographs will be taken before we begin.
To create your new brow template in the skin I will make my "first pass". This can be the most uncomfortable part of the treatment as it is done only with the pre-numb. The feeling is often referred to as "scratchy" but nothing horrendous rest assured! Once the first pass is complete and the skin has been broken I will apply aneasthetic gel to numb the area whilst i begin on the opposite brow. I then repeat this process of working on a brow, numbing that brow and then working on the oppoiste brow until tge desired result is acheived!
Following the treatment I will take after photographs and go through a thorough aftercare with you to ensure your healing journey will be as effective as possible.
The treatment cost includes the initial treatment and a "perfection appointment" around six later. The perfection appointment is essential as in part of the healing process of the first treatment the body can push out a couple of hair strokes so the top up will reinforce the brow and fill in any areas necessary. It also completes the treatment to maximum potential. Please do not worry if your brows dont heal perfectly after your first appointment. Pigment fades 20-40% once healed so we can always go darker or tweak your shape when you return. Some clients may require a third top up to really reinforce the strokes in the skin - this will be charged accordingly.


Preparing for your microblading appointment is the very first step to acheiving your perfect brows:
-Do not work out on the day of your treatment.
-Do not tint, wax or pluck your eyebrow hairs in the two week window before your treatment.
-Do not take any blood thinners including Fish Oil, Gingko, Biloba, St John's Wort, Evening Primrose Oil or Vitamin E within one week of your treatment. (Prescribed thinners are different, they may be total restrictions or require doctors consent but this is covered in your pre-treatment suitability form) You may resume taking supplements 72 hours after your treatment. Not only do the listed above thin the blood, they can also affect the effectiveness of your aneasthetic.
-Do not take niacin within one week of your treatment.
-Do not exfoliate or have any microneedling done two weeks before your treatment.
-Do not have botox injected within three weeks of your procedure.
-Do not have a facial two weeks before your treatment.
-Do not have sunburnt skin for your procedure or have long unexposed periods of sun.
In order to have minimal bleeding and poor colour retention:
-Do not drink alcohol 24-48 hours before your procedure.
-Do not drink coffee before your appointment.
-Do not take pain relief such as aspirin or ibuprofen as they are blood thinners.

As mentioned above, the feedback from the majority of my clients is that the first pass can feel a little "scratchy" but thereafter is pretty much pain free. I have has numerous ckients fall to sleep it hurts that little thanks to the special numbing procedure I use. Pain tolerance levels will vary from person to person, but every effort is made to keep the client comfortable during the entire procedure as it makes my job easier. Having microblading done during your menstrual cycle may increase discomfort during your procedure. If you smoke, the topical anesthetics used during the treatment will not last as long. If you have been diagnosed with Fibromyalgia, be aware that this may affect your sensitivity tolerance to the procedure.
Day one.
There is a possibility that the brow area could be slighty red and swollen after the procedure dependant on the individual
client's skin sensitivity. The hair strokes will appear crisp, fine, sharp and not to dark immediately after the treatment.
Day two to five.
As the hairstrokes start to heal the colour will intensify, this is due to the scab formation. The colour has now expanded from 2D to 3D as it is sitting in the top of the skin in the formation of a scab. At this point the brows can look intense and begin to feel itchy.
Day six to ten.
This point of the healing process can be the most daunting as the scabs start to exfoliate and the brows may look patchy.
Day eleven to thirty.
At this point the strokes are at their lightest, this is caused by the bodies natural healing process. You may choose to add pencil and/or powder at this stage whilst they appear light. When implanting a product into the skin the bodie's natural reaction is to dispose of the antibodies. The product is drawn deeper back into the dermal layer in an attempt of disposal. Once the body stops trying to fight the product, the colour slowy oushes forward to the surface. The full potential is only seen when the skin has healed fully internally.
Day 31-50
The true colour could have healed upto 40% lighter or upto 10% darker depending on the skin undertones. The healing efficiency is also effected by the client following the aftercare and the client's health. You will be due for your top up around this point.
-If you are planning a holiday abroad it is worth leaving two weeks between your appointment and going.
-If you have extremely oily skin, microblading will not work as well for you. The constant production of oil can cause the hair strokes to heal with a diffused, softer look.
-If you are a frequent smoker, your pigment may fade sooner.
-If you are iron deficient or Anemic, your pigment may fade sooner and bleeding/bruising may occur during and after the procedure.
-Your appointment will take between 2 and 3 hours depending on how much work is required.
-The sun, UV, chemical peels and topical acids will speed up the fading of your semi-permanent


No comments
Post a Comment